The WILD 635 which we've tested breaks the monotony of traditional monocular designs that have saturated the market over the last years. Aimed at setting a new standard in design and image quality, this device combines high-end optics and image processing with a user-centric design to please both the new and seasoned thermal users. So how exactly did Thermtec win us over? Let's find out!
Table of Contents
Models and Features
The Thermtec WILD is available in 6 different configurations:
The WILD 635 comes with solid specifications, featuring a 640 x 512 pixels sensor (12µm) which operates at 50Hz, ensuring smooth imaging and allows for tracking (fast) moving subjects. The 35mm F0.8 lens provides exceptional clarity and depth in imaging, but more on that later. The WILD comes in both LRF (Laser Range Finder) and Non-LRF versions; our focus here is on the Non-LRF version, which is aimed at observation and security. If you're a hunter then we suggest you opt for the LRF version which has an impressive 1000m range with ~1 meter accuracy.
WILD Unboxing
The WILD 635 arrives in a well-designed carton box, featuring a magnetic lever and two flaps/doors that open to reveal the device. This packaging approach adds a small touch of sophistication to the unboxing experience. Inside, users will find a complete set of accessories accompanying the main unit.
You'll find a sturdy carrying case for protection, a lanyard and hand strap for flexible carrying options. A charger with two 18650 Lithium batteries (one spare) and a USB-C cable for power and data transfer. Providing everything necessary to get started with the WILD 635 right away.
A Daring but Flawless Design
Flawless, perfect...those words we can't recall using very often (if ever). But this design deserves a chapter of its own. ThermTec could have opted for a more contemporary look, saving R&D funds in the process and probably still get away with it.
But it looks as if they just took a blank page and start designing the WILD from the ground up, always having the end-user in mind. I don't know if they did this through surveys, experience or just excellent product development, but the result is a device which is super comfortable to use and easy to recognize.
From its sleek looks, full-rubber-coated body, IP67 rating and lens focusing mechanism to the lens cap, color scheme and matte-red aluminum ring. Everything has worked out perfectly.
Let's sum up the most important parts:
- A 4-way joystick which makes navigating the menus a breeze
- A focus wheel which can be operated with just one finger (!)
- A replaceable battery (!)
The WILD 635 can be completely controlled single-handedly, not just on paper but during our tests as well. The joystick is very easy to get used to, the focus mechanism is superb, instantly making traditional lens focusing and 3/4-button layouts feel cumbersome and outdated.
Does 18650 ring a bell? For many (night vision and seasoned thermal) users it will. For years the commercial thermal imaging userbase has been calling for replaceable batteries and it seems finally someone listened. And I'm not talking about Pulsar's (expensive) proprietary solution either. ThermTec instead opted for the widely available and well-tested 18650 battery.
The advantage of this is that you'll get virtually unlimited runtime and there's no need to send the device back for repairs when there's a battery failure (which happens more often than you think), instead you just replace it with a fresh battery of your own.
To prevent moisture and dust the battery cover is designed with a two-way locking mechanism. It's very sturdy and it won't ever accidentally open. In fact, the first time we tried to open it we thought it was stuck, but it just sucks vacuum, that's the best description I can give.
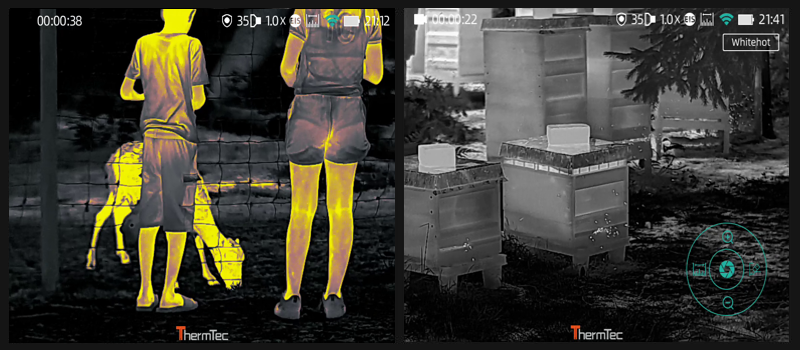 Various stills, yes that's a beehive on the right side!
 Operating the WILD
This monocular is hands down the most user friendly thermal camera we've tested.
First things first; to power up this device you'll press and hold the power button for a few seconds. You will be greeted with the ThermTec splash image and in about three seconds you can start observing your surroundings.
A quick tap on the power button toggles between standby/running mode and long press again to power off the device.
Ow did we mention to flip open the lens cover as well. Even after all these years we still forget it regularly and for a second wonder why our subject is not showing up on screen.
We're very fond with this flip-open design, no more guessing of where you put the lens cap after a long viewing session.
Now the device is powered on and ready there will be 3 'buttons' you will be using the most, all within easy reach.
Focus wheel
We can not comment on this enough, it's a breeze to quickly accurately focus the WILD. No more fiddling about with turning the lens itself. Best of all this can all be done with one finger. Having just enough friction to keep it from moving while still being easy to turn.
Navigational 4-way joystick
During operation and while not in menus, the joystick works as followed:
- Up direction -> Zoom in (Up to 4x)
- Down direction -> Zoom out
- Left -> Range finder (Only active on LRF version)
- Right -> Cycle (6) color palettes
- Right & Hold -> Toggle outline mode on/off
- Center click -> Calibration
- Center double-click -> Enter menu
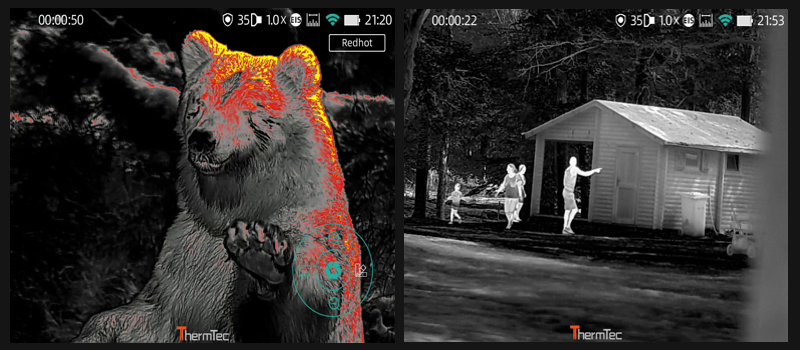 Close encounters with a brown bear and a random playground shot
 Camera button
The camera button works as you'd expect. A short press takes a photo, holding the button for a few seconds starts the video recording. In case you were wondering...yes, the videos have sound, recorded with the built-in microphone. Similarly, when long pressing the button again it will stop the recording.
If you want to take a picture while recording that's also possible.
As you can see there's not much to it and you won't be needing a degree to get up and running with the WILD. Let's dive a bit deeper into this device by exploring the menu options, shall we?
We'll display all options in a schematic structure first and explain some of the options in more detail after. Please note that everything shown here is subject to change with firmware updates.
Image settings
- Mode
- Sharpness
- Denoise
- Brightness
- Contrast
General settings
- Image correction
- OSD (On Screen Display)
- Anti-Burn
- EIS (Electronic Image Stabilization)
- Tracking
- PiP (Picture in Picture)
- Ranging (Not applicable for the Non-LRF version)
- AI Set (predefined list of target heights)
- LRF Set (set LRF offset)
- LRF Boost (Combined LRF and AI ranging)
- OLED
- Hue (Gray, Blue, Purple and Red)
- Brightness (1 to 5)
- Blind Pixel (Replacement)
- Software replace blind pixels
- System
- Auto shutdown (30 mins, 60 mins, off)
- Joystick calibration
- On-screen logo (On / Off)
- Time / Date (Enter date and time settings)
- M / Yd (Switch between the metric and imperial system)
- Lang (Change language)
- Version (Info about current firmware version)
- Reset (Revert back to factory settings)
- Update (Load a new firmware)
Network settings
- Hot spot (On / Off)
- Name (Access point name)
- Password (Access point password)
Files
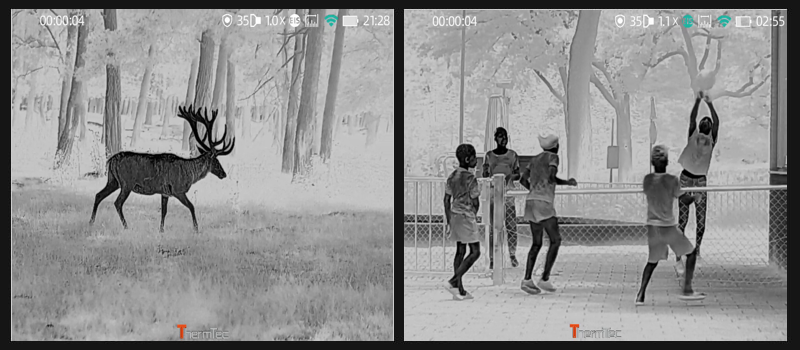 Wildlife or fast paced action, both work equally well
 I think most of the settings are self-explanatory, but let's go over some of the options in more detail.
Electronic Image Stabilization (EIS) tries to counter the inevitable shaking of your hands, especially when zoomed in. It will eat away some pixels to act as a buffer but in return gives you a more stable image.
Blind Pixel Replacement is a technique used to correct defective pixels in displays. It involves analyzing the surrounding pixels to estimate the correct color and brightness for the faulty pixel, then digitally replacing it to improve the overall image quality.
A Hot spot is needed to act as an access point for your phone or tablet, so you'll be able to stream video and copy files.
Battery Life and Charging
The WILD 635 offers two charging options. The first is in-device via the supplied USB-C cable, which allows for easy charging from a variety of power sources. This is particularly useful when you're on the go or in remote locations.
Alternatively, you can use the supplied dedicated charger, which can charge both batteries simultaneously.
In our real-world testing, we achieved around 7 hours of use on a single charge. While this falls short of the advertised 10 hours (Edit: 8 hours!), it's important to note that we were not doing a lab test under ideal conditions. Real-world usage often involves varying environmental factors and usage patterns that can impact battery performance.
That said, 7 hours of operation is still very respectable and should cover most users' needs for extended observation sessions. For those requiring longer periods of use, the ability to quickly swap in a fresh (18650) battery becomes a valuable feature.
Image Quality
We know you've been waiting for this one, after all, what good is a device if all it has is its looks. We can beat around the bush and keep you guessing, but let's start by saying that the image quality of the WILD 635 is excellent, superb even, and in line with the most expensive offerings from competitors like Pulsar and surpassing many others like HIKMicro, ATN, Guide IR and the likes.
So, what exactly makes us come to this conclusion so fast? We're not being paid to write this article, nor do we receive any affiliate fees for this one, so hear me out...
There are many tangibles when it comes to image quality, such as resolution, pixel size, lens type, refresh rate, screen type etc., but these only give you an estimation of what you can expect.
Only when everything is synchronized with each other (best lens for this sensor, best image algorithms etc.) and even things as ease of focusing contribute to the viewing experience and final image quality.
You often hear that thermal cameras have a flat image, and while there is no true 3D perception possible (unless you have true binoculars), image algorithms try to make up for that. The most praised devices all have this in common 'a sense of depth'. And we dare to say that the ThermTec WILD is among these devices.
Fun fact for expert users: When you set the OLED screen to a blue hue you'll be hard pressed to find people who can differentiate between the WILD and say a N-Vision NOX which is regarded as one of the best monoculars, image quality wise.
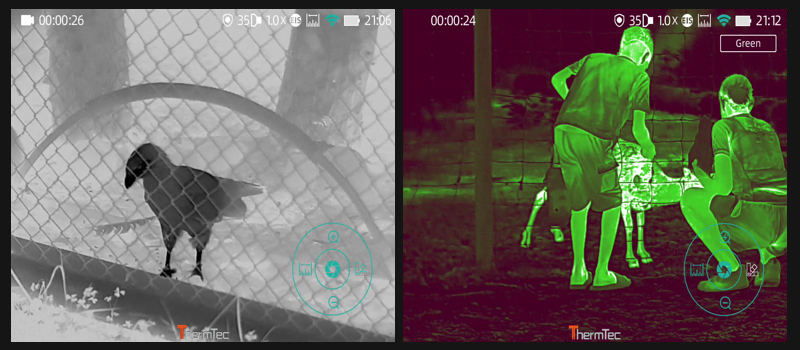 Various frame grabs in a wildpark
 ThermTec Outdoor App
The companion app which is both available for iPhone and Android phones (or tablets) gives you access to live streaming, firmware updates and makes it easy to copy files over to your device (as opposed to connecting the WILD physically to your computer).
To get started first you'll have to enable the hot spot via the settings and download the app for your phone or tablets' operating system. Once this is completed you'll connect to the WiFi network just as you would do with any other network (using the details you've set in the network settings).
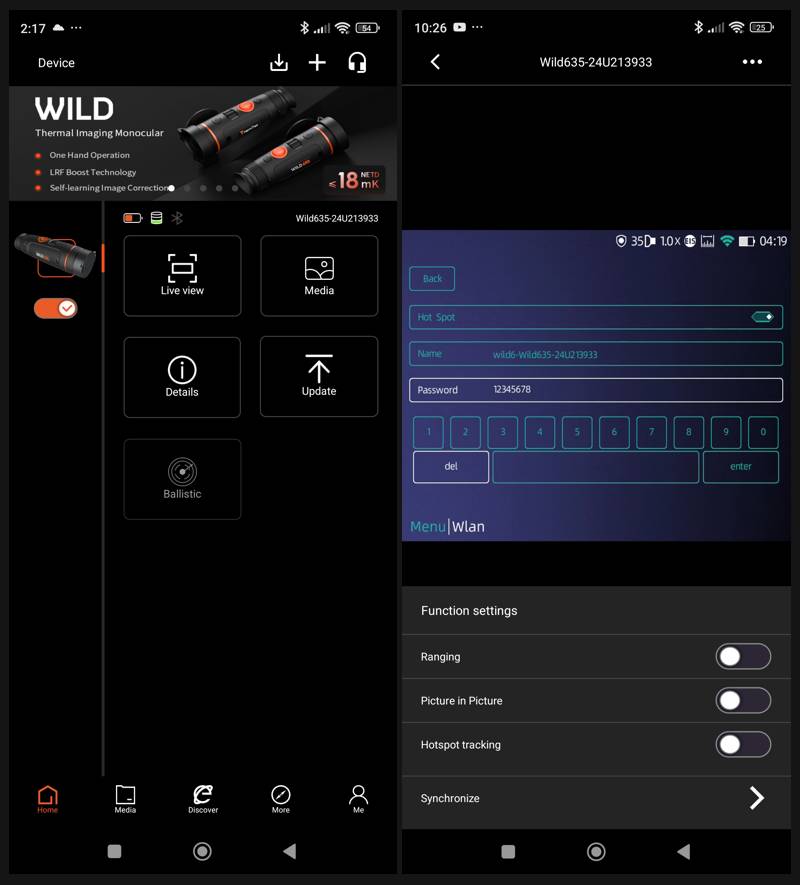 ThermTec Outdoor App Home Menu and WiFi Settings
Now it's time to open the 'ThermTec Outdoor' app and if all went well you see the device listed and connected.
From the home menu you can choose one of the following options:
- Live Streaming
- Media (browse images and videos stored on the device)
- Details (device name, firmware version and serial number)
- Update firmware
- Ballistic (greyed out because these are meant for ThermTec scopes)
Live view is what you'll be using the most and has quick access to most settings as well such as zoom, color palettes, contrast and image calibration.
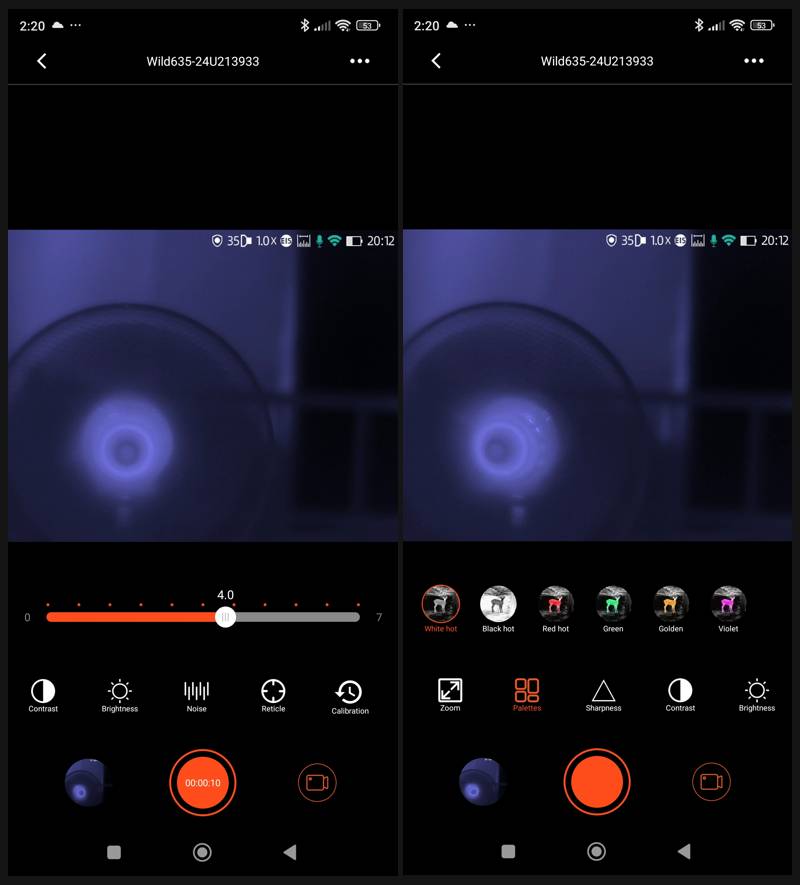 While Streaming you can Easily Change most of the Settings
 The app works well and we did not encounter any crashes or hiccups. Image delay is about 0.7 seconds on the phone we've test it on.
You might be wondering why do you need an app (besides copying media to your phone or doing firmware updates) but trust us, we've seen the most fancy setups...for example people mounting it on top of their car with a remote controlled platform to pan the environment, all while enjoying their climate controlled environment.
Connect with ThermTec
Stay up-to-date with ThermTec's latest product offerings, firmware versions and deals by using one of the links below: