Table of contents
Introduction
As with every large spending you’re about to make, ask yourself this question first: Do I need a thermal camera, and if so, why? This sounds like a rather odd question coming from a site which is all about thermal imaging cameras. But you should always check out other, sometimes less expensive options before making the plunge.
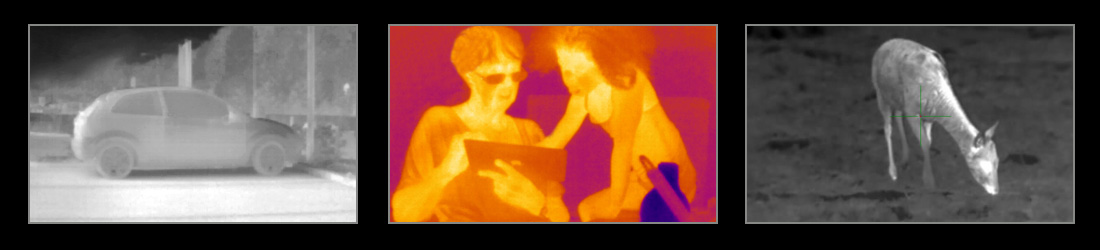 Various thermal imaging scenes
If, for example you’re hunting at night with your buddies once or twice a year in near-darkness you could look into image intensifier (i2) night vision or digital night vision devices as well, they might do the job just fine. Especially if you need that extra level of (identification) detail.
Of course, no device is perfect for every situation and this goes both ways; If your location should stay concealed but you need to scan a particular area, a thermal camera might be a better fit; you don’t want that infrared illuminator revealing your location by accident. And to continue the above scenario; you could use thermal camera at daytime as well to detect prey, don’t you try that with an image intensifier (i2) device!
Let’s start off with diving into the infrared world and see if we can learn something along the way.
The infrared waveband
Each night vision technology operates on different wavelengths within the visible and infrared spectrum. On our simplified chart below you see where the infrared waveband is located within the electromagnetic spectrum. It lies between the red limit of the visible spectrum and the beginning of microwaves.
 A visual representation of the electromagnetic spectrum
We can subdivide the infrared spectrum even further in the following parts (ordered by wavelength size):
- Near Infrared (NIR)
- Short Wave Infrared (SWIR)
- Medium Wave Infrared (MWIR)
- Long Wave Infrared (LWIR)
- Far Infrared (FIR)
For the sake of this article we will focus on the following night vision technologies:
- Thermal imaging
- Image intensifier (i2) night vision
- Digital night vision
Let’s find out between which wavelengths they operate and what their pros and cons are. Please note that wavelengths are often displayed in nm (nanometers) or µm (micrometers), we included both for your convenience (Formula: 1 µm = 1000 nm).
Thermal imaging
Wavelength:7000 to 14000 nm / 7 to 14 µm (LWIR)
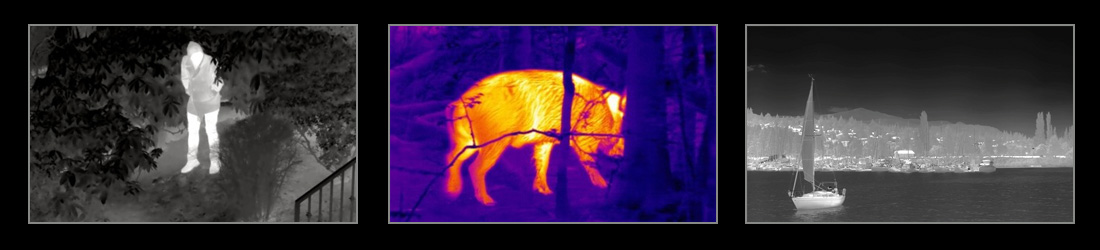 Various thermal imaging scenes
Located far from the visible light spectrum thermal imaging doesn’t require a light source at all. Instead, thermal imaging works by collecting the infrared radiation emitted by all objects with a temperature above absolute zero. Differences in radiation between objects make up the image which is then shown onscreen.
| Pros | Cons |
| Works in day- and nighttime | Difficult to identify individuals / less detail |
| Doesn’t need any light source | Generally more expensive, depending on the specifications |
| Greater ability to see through smoke and mist | Cannot see through glass |
| Doesn’t suffer from light pollution | Performance is linked to environmental conditions (time of day, humidity etc.) |
| Better ability to stay covert during surveillance operations | A lot of sensors still utilize a 9hz refresh rate (due to export regulations) |
| Long detection (not identification) range | A lesser sense of depth compared to other technologies |
Image intensifier (i2) night vision
Wavelength: 400 to 1000 nm / 0.4 to 1 µm (Visible light / NIR)
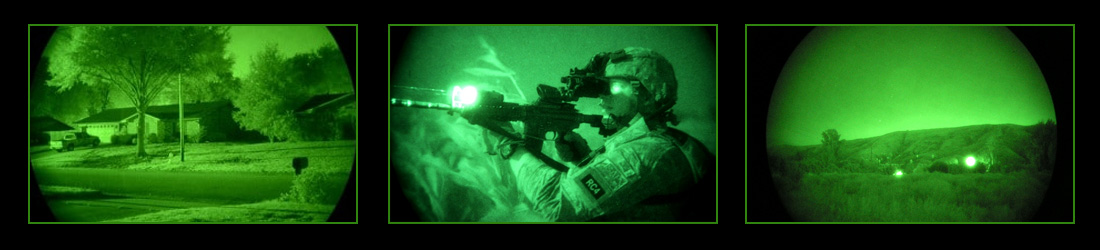 Various image intensifier (i2) scenes
Operating in both the visible and near infrared (NIR) spectrum an image intensifier device works by collecting available light (photons) from sources such as the moon, stars or infrared illuminators. These electrons are then being accelerated and multiplied before hitting the phosphor layer which converts the electrons to photons again resulting in the distinctive green images. Higher-end devices can operate under starlight conditions without the need for an infrared illuminator.
| Pros | Cons |
| Prices start quite low | Top-end devices are still quite expensive |
| More detailed images, depending on the resolution (lines per mm) | Image intensifier tubes degrade over time |
| Great battery life, 40 hours or more on a single battery | Highly sensitive to light pollution |
| Can more easily be used for navigating at night | No ability to record photos/videos without special adapters |
| Sees through glass | Does require an infrared illuminator in total darkness |
| 1:1 refresh rate, no input lag | Useless during daytime |
Digital night vision
Wavelength: 380 to 850nm / 0.38 to 0.85 µm (Visible light / NIR)
 Various digital night vision scenes
Due to its relatively low price it’s a good way to get into night vision without breaking the bank. IR-sensitive CMOS and CCD sensors are being utilized to output a digital amplified image. Digital night vision devices still rely heavily on an artificial light source such as an infrared illuminator.
| Pros | Cons |
| The cheapest way to get into night vision | Does require an infrared illuminator at night |
| Works in day- and nighttime | Can suffer from input lag (lower framerates) in low light conditions |
| CCD/CMOS technologies are evolving rapidly | Lesser optics, although this might change in the near future |
| Easy to output video (wired and wireless) | Durability and ruggedness are generally not up to par compared with other technologies |
Now with our short introduction to night vision technologies out of the way let’s go ahead and dive into the thermal imaging world!
Types of thermal imaging cameras
Thermal imaging cameras are being utilized in many industries and come in a variety of form factors. From long range, stationary surveillance cameras to medical equipment used to detect musculoskeletal problems. On ThermalBase however our main focus is on the following types of devices which are targeted at law enforcement, the military, hunters and outdoor enthusiasts:
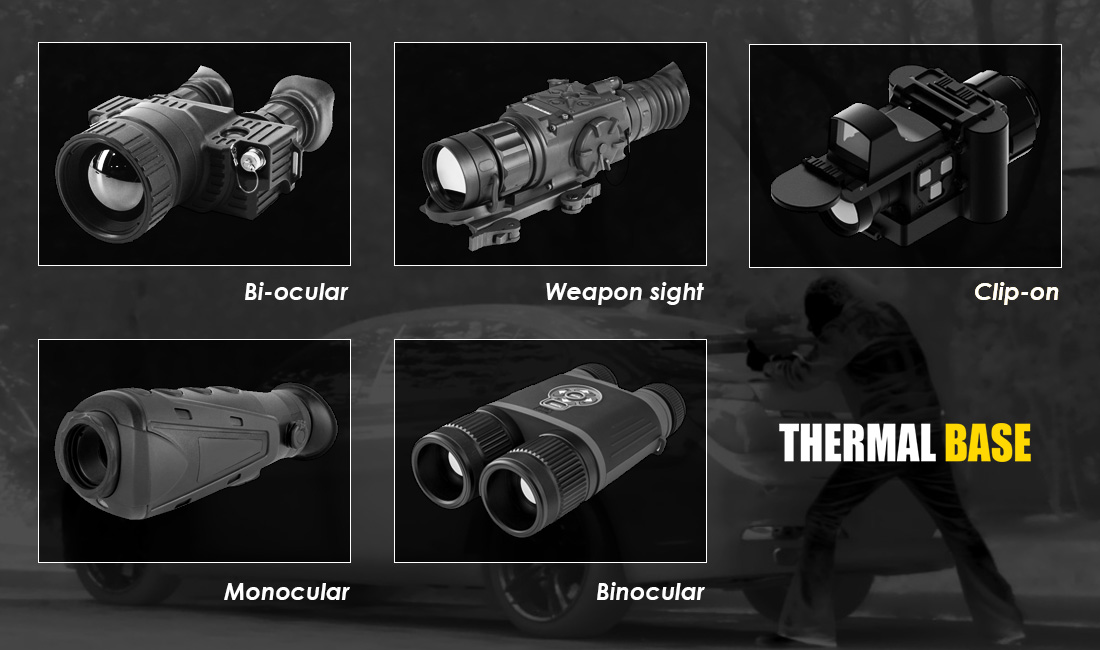 Types of thermal imaging cameras
 - Bi-ocular
- Often confused with binoculars, a bi-ocular consists of two eye pieces but only one lens and thermal imaging sensor. Although not stereo-vision a bi-ocular is often preferred for an added sense of immersion.
- Weapon sight
- A dedicated weapon sight replaces your day sight and is being utilized by law enforcement, military and hunters across the globe. Being fully digital, thermal weapon sights often come with extended functionality (custom cross hairs, ballistics calculations etc.).
- Clip-on
- A clip-on device can be attached in front of your day sight to quickly extend its capabilities with thermal imaging.
- Monocular
- With a single eyepiece and single lens, the monocular is a compact tool which can be useful in many situations, ranging from SAR to surveillance.
- Binocular
- Yielding true stereo-vision (perception of depth), a binocular consists of two eyepieces, two lenses and two thermal imaging sensors.
Regardless of the type of device you’re looking for, they basically all made in a similar fashion. A lens, a thermal imaging sensor, an image processor, a battery unit, a built-in screen and a housing to package the whole deal. Image quality-wise, the lens and sensor are by far the most important parts of your device.
Let’s find out what to look at and what to watch out for when buying your first thermal imager…
Get the right type of device for your usage
The right tool makes any job easier, the same goes for buying a thermal imager. If you’re a hunter you might think the only tool you need is a thermal sight. But what if you already own a great day scope, would a clip-on be an option for you?
 SWAT team ready for a mission
Also, if you’re doing surveillance you might opt in for a binocular, just be aware that both of your eyes need to adjust to the dark again after use (night blindness), which can negatively impact your mission.
A 19mm lens yields a wider field of view (FOV) but you’ll lose detail further away making it less ideal in situations where identification of objects is important.
“Am I going to use my thermal imaging camera in harsh environments?”
“Do I really need a 60hz refresh rate when my target hardly moves? “
Write down similar scenarios and questions tailored to your unique situation. Along the way you’ll find that by answering these questions you’ll find your way to the device you need.
Familiarize yourself with technical jargon
Looking for your first thermal imager can be tricky since it often introduces technical terms which you haven’t seen before. It can even get more complicated when manufacturers use different measurement units for the same specification.
 Thermal imaging technical terms
But fear not; do a little research and you’ll find out that with your newly gained knowledge, choosing the right thermal imager suddenly gets a lot easier.
Here are a few ones to get you started:
| Specification | Area | Description |
| F-number | Lens | The F number describes how sensitive a lens is. A lower F-number let’s in more thermal radiation. |
| Pixel pitch | Thermal imaging sensor | The pixel pitch, measured in micrometers (µm) is the distance between the centers of each pixel. |
| NUC | Thermal imaging sensor | Non-Uniformity Compensation (NUC) are factory calibrated lookup tables which select the best settings for a specific temperature range, increasing the image quality. |
| Emissivity | The viewed object(s) | A number (between 0 and 1) defining the relative amount of thermal radiation emitted from an object’s surface. |
We’re working hard on our thermal education series which aims to get your thermal imaging knowledge to an advanced level in no time. We will update this article accordingly once completed.
Don’t be scared to look at other brands
One of the main goals of this independent platform is to give you, our reader, a clear view of thermal imaging cameras available on the market today. This also means that for manufacturers around the globe it’s an unbiased stage to showcase their devices.
Probably you already know a few of the larger brands, but there are plenty of manufacturers which you might not have heard of before. Keep in mind that there aren’t that many places where thermal imaging sensors are being produced. There’s a good chance a device from a particular brand utilizes the same sensor as their more ‘famous’ counterpart.
Non-consumer grade devices can often be tailored to your mission’s needs as well, generally this can be done easier at smaller manufacturers. They might even have some field experience themselves and a lot of technical know how to help you on your way.
We’re constantly adding new devices and manufacturers to our platform. If you’re a manufacturer yourself and want to be a part of this platform please contact us.
Ask a friend or relative who already owns a thermal imager
If you’ve never worked with- or seen a thermal imager in action try to reach out to someone who owns one. Even if it’s not the type of imager you’re looking for it will help you to get a better understanding of the technology.
Of course you could also go to your local dealer and try out some devices over there. In general, most thermal imaging dealers are passionate about what they sell and they can offer you valuable advice and answer any question you might have.
Enjoy the ride!
We hope this article helps you on your way to finding the best camera for your needs. Tip: You can use our thermal camera comparison tool to quickly compare specs of various devices.