Table of contents
This is a thorough review of the LM6P-25 which requires at least one cup of coffee to read. If you're in a hurry you can skip to your area of interest using the links below.
 LM6P thermal imaging monocular
Introduction
LMIR, an acronym for 'Lao Marcx InfraRed' is probably one of the names you might have heard of but haven't seen around in your favorite stores. This is mainly due to the fact that their target region has always been towards the Asian markets, in which they are a well-established name.
They are based in Wuhan, China and have been manufacturing thermal imaging devices for a good decade now. LMIR specializes in measurement, vehicle and handheld thermal imaging devices.
Quick features
LMIR's latest product in their wide range of devices is the LM6P, a high quality thermal monocular with features including:
- 384 x 288 Vox Sensor
- WIFI streaming to a phone/tablet or PC
- Available with 15mm or 25mm lens
- Drop resistant and submersible
- AMOLED display
- PIP (Picture In Picture) zoom
- Stadiametric range finder
- Laser target pointer and LED flashlight
We will be reviewing the 25mm variant now which happens to be one of the first models to leave their factory.
 Stills taken from LM6P footage
Unboxing the LM6P
The LM6P comes in a rather unassuming packaging, a rectangle shaped white box, the only way to tell it's this device is on a little sticker showing the model name, software version, assembly date and company logo. The box is made of a hard type of carton, you won't damage it when you accidentally drop it in all your excitement.
After taking off the top cover you're presented with the device itself, the focusing ring and an instruction manual in English. We were a little impatient when ordering this device telling LMIR we would be just fine with the Chinese version but they wanted to finish the English manual first and do some test on their latest software updates before shipping, kudos to LMIR for this kind of quality control.
The box itself consists of two compartments stacked on top of each other and separated by some dense black foam. After taking out the LM6P together with the first layer you'll find 3 more black carton boxes which hold the carrying bag, lanyard and cleaning cloth. They also included a charger and (Micro) USB cable. Unfortunately (for us at least) the charger came with a US socket connection which we cannot use here in Europe. We couldn't care less though, I'm sure everyone has a USB charger these days and if not, you can plug it into your computer's USB-port to charge.
To sum it up, this is what you'll get:
- LM6P Thermal Imaging Monocular
- Focus ring
- Instruction manual
- Lanyard
- Carrying bag
- Cleaning cloth
- USB Charger
- (Micro) USB Cable
How does it look?
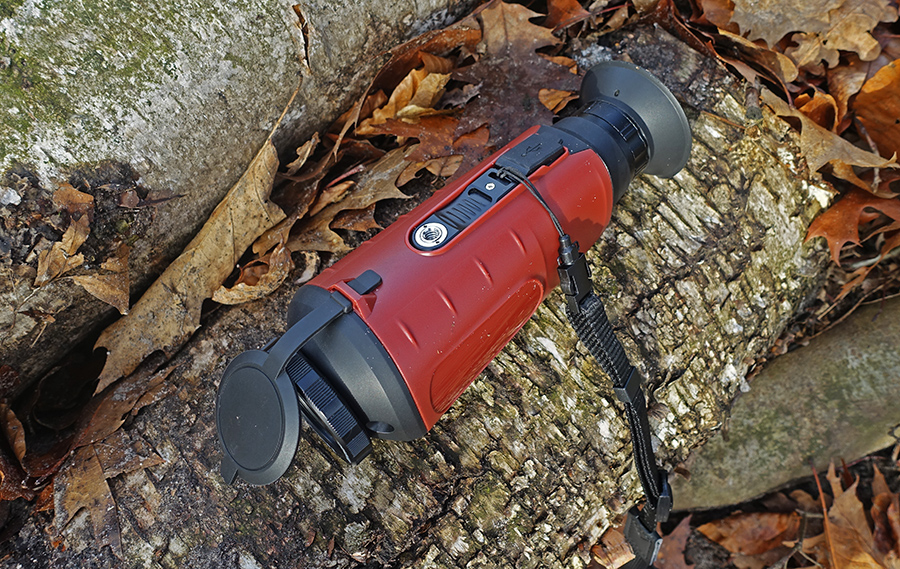
The first thing which grabbed our attention was the color of the LM6P. It's a brownish tint with a slight direction towards the red spectrum. The official name of this color is, how surprisingly…red-brown. We really like it and makes the LM6P standout in their product line.
The red-brown part is made of a solid plastic as well as the diopter adjustment ring. The rest of the device (black parts) are made of hard rubber. The eye-cup is made of a softer type of rubber as well as the buttons and lens-cap.
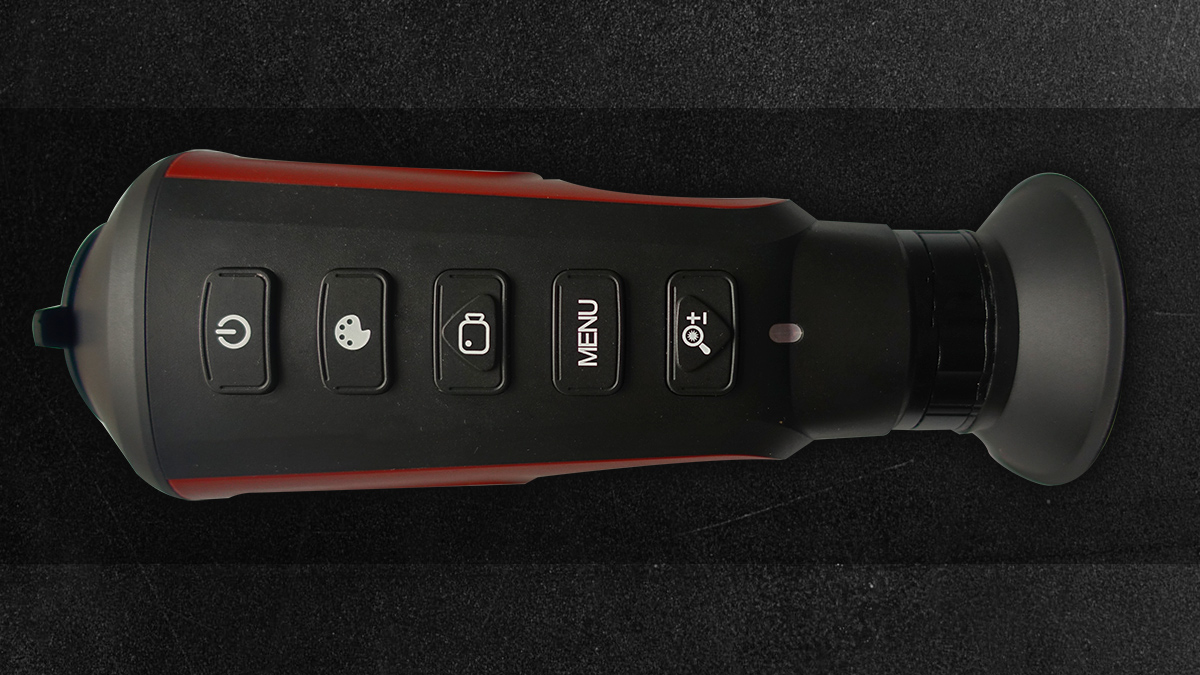
Top view
Here you'll find 5 buttons and a small power indicator LED and the diopter adjustment ring. The buttons you'll find here are:
- Power
- Color palette
- Record
- Menu
- Zoom
We'll talk more about each of the button's function(s) further down this article.
 LM6P top view
 Bottom view
On the bottom of the device you can find the tripod mount which fits a standard tripod screw. You will also find the lanyard connection. Opening the small cover will present you with a Micro-USB port which serves both charging and data-transfer purposes. Another small LED will show you the charging status here (red = charging / green = fully charged).
 LM6P bottom view
 Side view
Both left- and right side look identical and can hold the company/model sticker in the rounded indented area, our device came without the sticker, we can imagine this is due to being one of the first units of this new model.
Front view
On the front side of the LM6P you'll find (left to right):
- Laser pointer
- 15/25 mm lens
- (White) LED flashlight
The focus-ring and lens-cap can also be attached here. We'll talk more about this part later on in this review. Please note that the 15mm version comes with fixed focusing, omitting the focusing-ring altogether.
Back view
Just what you expect to see here; the round rubber eye-cup and a (relatively) large AMOLED spotting 1024 x 768 pixels.
Button functions explained
This monocular comes with 5 physical buttons, let's see what they do one by one.
 LM6P button layout
 - Power button
- Long press: Power on/off the camera
- Short press: Turn on/off the LED flashlight
- Color palette button
- Iterate through the 4 different color modes
- Record button
- Long press: Zoom 2x, 4x (This only works when the crosshair is enabled)
- Short press: Start/stop video recording
- Menu button
- Long press: Open menu
- Short press: Start stadiametric rangefinder
- Zoom button
- Long press: Toggle 1x, 2x and 4x zoom
- Short press: Turn on/off the red laser pointer
Exploring LM6P's features
This device is not packed full of features you probably never use, it packs the basics and then some. Let's see what we can do with it shall we?
Video recording
You can record videos in 2 different ways:
- On the device
- On your phone/tablet (you can see how this works in the 'companion app' section)
There's a dedicated button on the device to record videos which makes it easy to capture the action when it's happening. A short press starts the video and another press ends the recording session. Videos are being stored on the LM6P's internal memory which holds about 14.4 GB of usable space, which translates to roughly 16 hours of recording time, more then enough for most people.
Please note that recordings do not show any other on-screen information like battery life or a company logo.
Unfortunately there's no way to take a picture at this time, we hope LMIR includes this in a future software update cause it can be useful in certain situations.
 Various stills taken from LM6P footage
 Color palettes
Unlike some other cameras the LM6P has just 4 different color palettes which can be accessed through the dedicated color palette button. 4 color modes might not seem much but they made the right selection and you're not going to miss any fancy rainbow colors. These modes are available:
- White hot
- Black hot
- Blue palette with red/yellow hotspots
- White hot with red hotspots
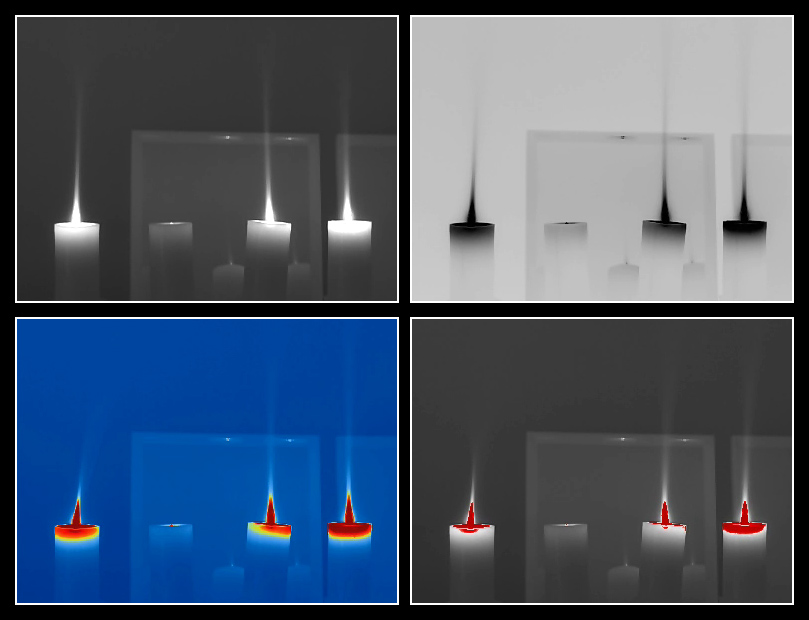 4 color palettes
The white hot/black hot modes give you the highest detail, the blue palette is easy on the eyes and the hotspot modes are useful to recognize warm objects easily which is useful for hunting and surveillance.
Zoom
The zoom button (long press) cycles between 1x, 2x and 4x zoom. We found the 2x zoom the most usable in terms of image quality and stability but 4x zoom is still very usable due to good antialiasing. Unlike the PIP zoom the dedicated zoom enlarges the whole screen and not just a part of it.
LED light
A useful addition is the white LED light which can be turned on (and off) with a short press on the power button. It's not made to replace your flashlight but it can definitely light the trail in front of you making it easy to navigate in darkness and without the need for an extra tool.
 Left: LED light / Right: LED + red laser pointer
 Crosshairs and laser pointer
A short press on the zoom button draws the onscreen crosshair and turns on the laser pointer. You can then cycle through the 3 different type of crosshairs:
- A small crosshair calibrated to intersect the laser at 8 meters
- A small crosshair calibrated to intersect the laser at 25 meters
- A larger reticle type which has the laser turned off
You can change the position of the crosshair on your screen in the settings to calibrate them for different distances. In our tests the 8- and 25-meter crosshairs were perfectly aligned with the laser's red dot.
Stadiametric rangefinder
Unlike a Laser Range Finder (LRF) which measures the time it takes for a laser to reflect back on a sensor, a stadiametric range finder works by solving the principle of 'similar triangles'. The lens properties are known to the LM6P, what's not known is the height and lower/upper bounds of the target, thus we need to set this.
A short press on the menu button brings up the measurement screen. First we need to set the height of the target (ranging from 0.1 to 9.9 meters), after that you'll have to define both the top and bottom of the subject. Another menu button press gives you the measured distance instantly.
The results seem accurate but as with all stadiametric rangefinders it's important that the subject doesn't move and that you have a good idea about the target height of your subject.
 LM6P mounted on a tripod
 PIP (Picture in Picture)
If you need that extra bit of detail of the subject you're looking at you can enable the PIP function. It enlarges what it sees in the center of the screen by 2 times. You can choose to show the enlarged view in your top-left, top-middle or top-right corner. It's especially useful to identify small prey.
Other settings
We've talked about the most used features above but in the menus we can also set things like contrast ratio, sleep time and we can turn the WiFi on or off. Please note that the WiFi needs to be turned off before you can transfer your videos to your computer.
Streaming via WiFi
One of the nice features of this device is the ability to stream a live feed to your mobile phone or tablet. It connects via WiFi direct which means the LM6P is acting as a hotspot/streaming server. We didn't notice any large delays with the live feed, even when the signal had to pass through a concrete wall.
There are 2 versions available; one for the iPhone/iPad and one for Android based phones and tablets. Installing the iPad app was a breeze as it was easy to find it in Apple's app-store. The Android version however was hard to get by, it was only available in a Chinese app-store and not in the regular Android Playstore. We ended up installing a custom APK (Installer package) which we received from LMIR.
To get started with the app you'll first have to enable WiFi on the LM6P. After that make sure the WiFi on your phone/tablet is enabled as well. In your wireless network listing a new network will appear, named 'LM6P'. The default password is '88888888'. After you connected successfully you can open the app, it will start streaming automatically. Please note that recorded videos via the app are stored on your phone/tablet and not on the camera itself.
User experience & testing
This camera is relatively small, but certainly not made to fit in your jeans/pants pockets. If you got some deep pockets in your coat it will fit in there fine but we expect you to carry this one around with the attached neck-strap or tuck it away in your backpack when you're not using it.
Weight-wise our scale displayed 459 grams which is perfectly fine, light enough to do long observations and heavy enough for a steady image. The weight distribution of the internals is good as well so the camera doesn't tip over to a particular side.
Button placement
Since the buttons are placed in the middle the LM6P can be used by both left- and righthanded persons. Your thumb slides under the device and with your finger(s) you can control the buttons. The buttons themselves are firm and require a bit of pressure to activate, enough so you won't accidently press a button when your fingers are resting on them.
Display and eye-cup
Spotting a large 1024 x 768 AMOLED screen everything is looking nice and sharp, menus are easy to read and the eye-cup prevents (sun)light from coming in.
Sensor calibration
The LM6P corrects its sensor on random (random to us at least) intervals. Keep in mind that the familiar click sound, while not really loud, is audible in quiet surroundings. The screen freezes for about half a second when this process takes place.
Durability
Thermal cameras are still a large investment for most of us and it's always nice to know that your device is safe wherever you go. It's waterproof, fully submersible and survived drop tests from 2 meters on a concrete floor. I hope you'll forgive us for not testing everything out ourselves, we did use it in some fierce rainy weather which was fine, however, dropping it on concrete…I believe LMIR has a video of that which we'll just take their word on.
Dust doesn't go inside either, the front, back and buttons-area are well protected against it, the only place which we can see some dirt collecting over time is in the ridges where the red-brown plastic meets the black parts, but nothing you can't clean yourself.
Testing the battery
We got around 4 hours on a single charge with the WiFi turned off. It's advertised as being operational for 5 hours…in perfect conditions. We had some freezing temperatures and a lot of turning on/off of the device while using it. We think we could stretch it to 4,5 hours easily with some precautions so we're fine with that. If you want to extend the running time even further you can plug in an external power-bank, it can charge and operate at the same time.
 Various stills taken from LM6P footage
 Let's focus
There's a diopter adjust ring before the eye-cup to compensate for your eyes/glasses which works as expected.
When unboxing the package, we saw that it comes with an external focus ring, it has 4 pins and can slide in the sockets around the lens. You'll be able to walk around with the focus ring attached but you could be wondering if it might fall out unexpectedly.
Depending on your usage case you may not have to use the focus ring that much though, in the field you can just set it to far-focus and you'll be fine. Please remember that all this refers to the 25mm version, the 15mm has a fixed focus lens.
Is this a deal breaker? Actually, no, you'll get used to it and when you do, you're presented with one of the sharpest images you've seen on a device with these specifications. If you're keen on having a fixed focus ring than you can take a look at its big brother, the LM640, with an upgraded (640 x 512 pixels) VOx sensor and 35mm lens.
Let's talk image quality
We've saved the best for last, let's talk about the image quality of the LM6P now. This device delivers some crisp images, and we're talking 'individual hair crispiness' here.
The sharp F1.0 lens combined with the sensitive Vox sensor and an advanced image processing algorithm make you sometimes forget there are 'only' 384 x 288 pixels to play with. Tracking fast moving objects like birds, vehicles and planes is also quite easy due to the high refresh rate.
The performance of any thermal imaging camera is related to weather conditions as well. Humidity, temperature and rain all influence its capabilities. This camera handled rain, fog, sunny days and midnight like a champ. We haven't been able to test it at high temperatures yet, it's still a long way from summer here.
We were also pleased with its ability to handle high contrast scenes, going from the sky to the ground instantly recalibrated the whole screen without any noticeable hiccups.Please note that all pictures in this review are just still images from the videos and have not been optimized or altered in any way.