Table of contents
Use the navigation below to quickly jump to a specific section.
About the HT-series
The HT-series are developed in-house at HTI’s factory. This thermal camera serves a dual purpose and can both be used as a weapon sight and spotting scope. In this review however we’ll only focus on the build quality of this device and its spotting capabilities, we’re not taking it to the shooting range.
 HTI HT-C8
The HT-series is available with the following lens configurations:
There are no variations in sensor type, they’re all equipped with an imported 384 x 288 17-micron sensor.
Shipping
The first shipment didn’t go too well. But this has nothing to do with HTI. FedEx must have thought they were shipping a football, or maybe someone just had a very bad day at work. The package came badly damaged and the box, instruction manual, charger and adapter were destroyed with seemingly excessive force.
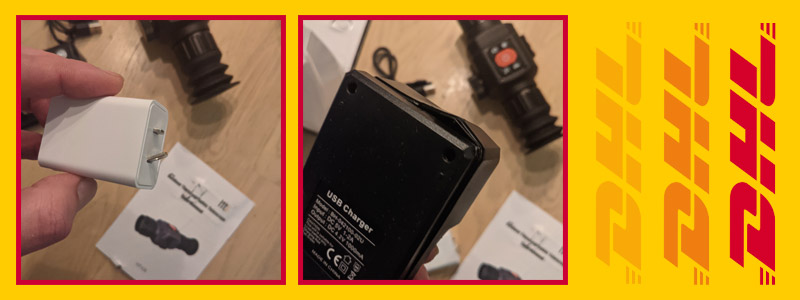 Bad bad DHL...
I didn’t have much hope for the camera to be intact but luckily it not only survived, it survived without a scratch or concern that something might be broken on the inside. Partly this is due to the fact that the camera has been placed in the middle of the foam, but more importantly that it’s just a rock-solid piece of metal, but we’ll talk about the build quality later on.
After close inspection I contacted HTI and they immediately shipped a new box, this time around I received a pelican case, bundled with replacements for the broken items (thanks Carrie!). Please note that I’m not sure if every camera will be shipped in a hard case. You’ll have to check this with your dealer.
Note to all manufacturers; please don’t ship thermal cameras worth thousands of dollars in a cardboard box. It’s both unsafe for the device and kind of disrespectful to the customer. I’m sure nobody minds to pay a little extra for a hard-plastic or metal casing. Ok, enough said; I will start the review from here and get you familiar with the HTI HT-C8 along the way.
Unboxing and first impressions
The HT-C8 comes equipped with everything to get you started. Inside the box you’ll find the following items besides the scope:
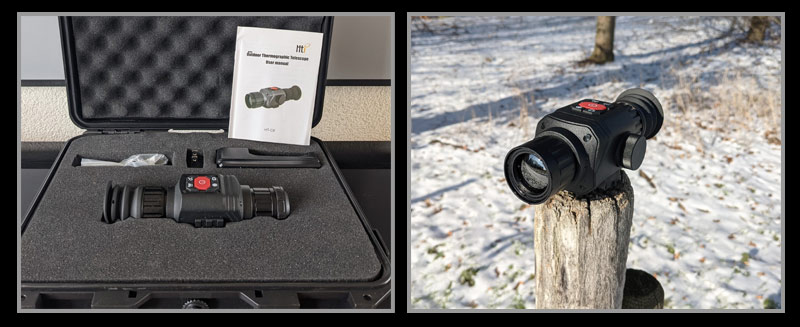 Unboxing the HTI HT-C8
- User manual in English (Download a copy at the bottom of this page)
- Li-ion charger to charge battery externally
- (US) plug and USB cable
- Rail mount plate
- 18500 battery
- Lens-cap
Taking the HT-C8 out of the box I can feel the cold metal of its body and the weight which comes with it. This is certainly no flimsy toy…
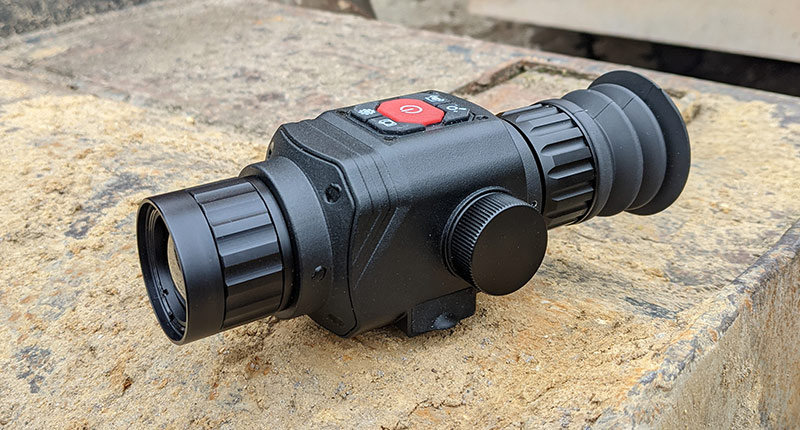
Looks, size and weight
This scope comes in an all-black aluminum-alloy body in a familiar, yet distinctive design. Mainly because of the big red button in the middle. And although looks don’t matter much for a thermal camera, it’s still nice to see a device which just looks right.
What does matter however is its functional design and it’s clear that some thought has been put into it by their R&D department while constructing it instead of just throwing some generic components together and hope it works.
The only thing I found distracting and felt a bit rushed is that on some parts they’ve added a bit too much liquid rubber to seal off the screw openings. I don’t care nearly enough to re-apply the rubber myself though.
Back
Here you’ll find the rubber eyepiece, the 1024 x 760 OLED screen and diopter adjustment ring.
Front
25mm F1.0 lens with focus adjustment ring.
Left (as seen from eyepiece)
The metal battery cover which makes sure the 18500 stays firmly in place and the rubber
Right (as seen from eyepiece)
A small rail for (future?) attachments. It seems perfect for a LRF attachment, but no word from HTI on that yet.
Bottom
Here you can attach the included connector for a picatinny/weaver rail. You can also attach it to a tripod using the standard 1/4-20 UNC thread.
Top
5 (rubber) buttons to control the HT-C8
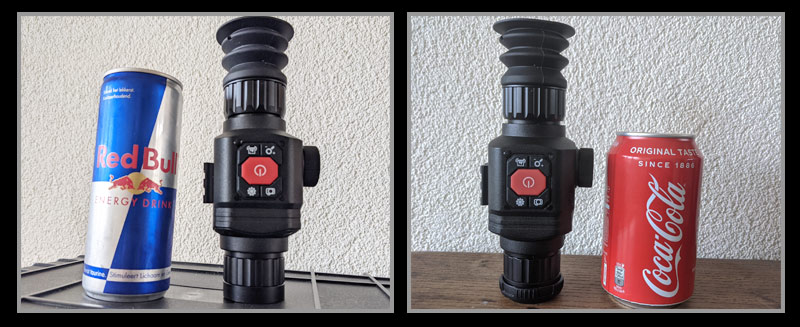
It weighs 488 grams including the battery, which is not much compared to some other weapon sights with this lens specification. To try out the weight without having the device nearby you can take a 33cl soda can + 5 AA-batteries (weird combo I know).
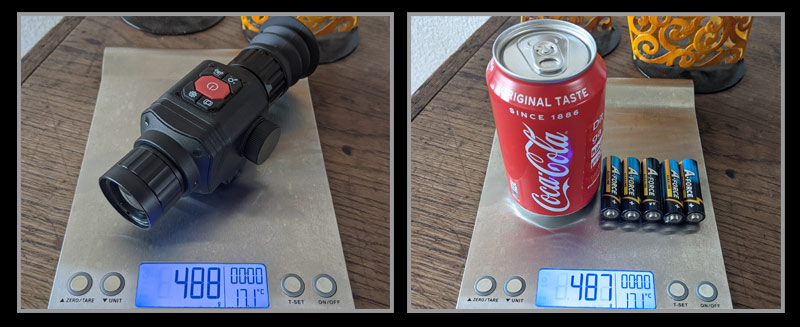 The HT-C8 weighs about 488 grams
The center of gravity lies just in the middle for this particular model, but will obviously shift more forward for the models with larger lenses.
The dimensions are as followed:
- Length: 173mm
- Length without rubber eyepiece: 135mm
- Width: 75mm
- Width without battery cover and side-rail: 55mm
- Height: 65mm
 HT-C8 Size Comparison
Build quality and durability
It’s factory-tested to resist impacts up to 2900g/s and is waterproof. Which means you can use it in some light rain but cannot be submerged completely. I’m not really a fan of going out in the rain but I did once during my time with this camera and felt confident that it wouldn’t do any damage, mainly due to everything being well sealed, including the buttons.
The body is made of one solid piece of metal and you’d really have to try hard to break this device. I’m not going to drop it on concrete though for the sake of this review but rest assured it will survive without any damage.
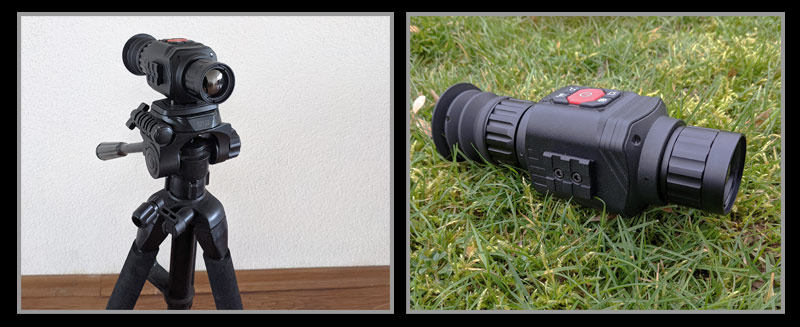 The HT-C8 can be mounted on a tripod
Even the lenses (both the ocular part and objective lens) are surrounded by metal (focus) rings. The eye-cup is made of durable rubber which seems both sturdy while maintaining its flexibility.
The battery cover is (surprise) also made of metal and has a firm spring to keep the battery tightly secured. When shaking the device there’s no noise or wobbly parts.
The overall build quality is excellent and surpassed my initial expectations.
Exploring the menus
This title is a bit misleading cause there is no menu to be found anywhere. The 5 buttons on the camera are almost mapped directly to a specific feature. This makes it ideal for newcomers to the thermal world since there is no learning curve.
 Should've worn gloves
More advanced users might miss some features here, more on that later.
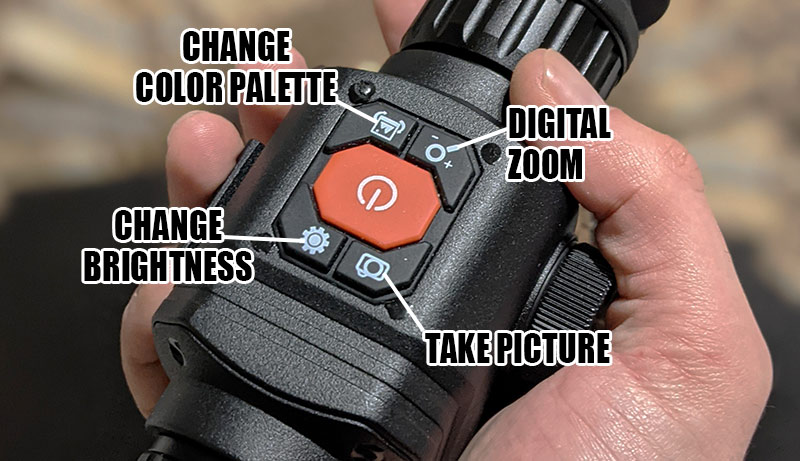
Let’s see what the buttons do:
- Camera button: You’ve guessed it right. It snaps pictures to the 8Gb on-board storage.
- Brightness button: Cycle through the 6 brightness levels
- Picture button: Choose one of the 4 color palettes
- Magnify button: Switch between zoom modes
- Power button
- Long press: Turn on/off the device
- Short press 1: Switch to reticle mode
- Short press 2: Switch to reticle calibration mode
That’s all there is to it. It could as well be shipped without a manual and I think few people would mind if they found it missing.
 Button Layout
Using the camera (software)
A long press on the power button greets you with the captivating tagline ‘Outdoor thermographic telescope’, which I suggest they change to HTI’s logo, just HTI C-8, or no text at all. The complete startup process takes less than 3 seconds which is nice and fast.
Powering off takes about 1 second. Please note that the camera will always revert back to the default color palette (white hot) when turning it on. The same goes for the reticle, you’ll always need to short-press the power button to bring it back into view.
Luckily the reticle position is saved when turning on the HT-C8 again. Speaking of reticles, there is just one type available, in one color (white). The horizontal line seems about 1 pixel wide, the vertical line measures 2 pixels, the lines intersect in the middle.
Digital zoom
You can cycle through the zoom modes (1x, 2x and 4x) with a press on the magnifier button. Please note that the reticle will not remain centered on your subject while doing so. (Update: A firmware update is available to fix this issue!) The zoom itself works fine and quick. Don’t expect miracles though, but this goes for all cameras with this resolution.
Taking pictures
The camera button allows you to snap a picture of your subject. It takes about 2 seconds before the camera is ready to take a new picture. Before a picture gets taken the brightness will be increased before it reverts back to the brightness-mode you’ve set before.
Pictures are stored on the build-in storage (8Gb) and are saved in bitmap (.bmp) format. Each picture takes about 110Kb. The reticle is omitted from the picture.
Please note there’s no option to record video and there’s no word of it being added in a future firmware upgrade. If this is important to you than this is not the camera for you.
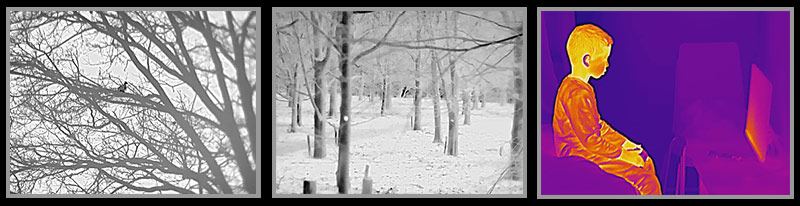
Changing the color palette
There are 4 color palettes to choose from; white hot (default), black hot, rainbow, iron glow. When you’re in the rainbow palette you can cycle though some sub-palettes using the brightness button.
 Black hot, rainbow and iron glow example
Brightness
Here you can choose between 6 modes which is more than enough. There’s no dedicated contrast button/setting so you’ll use this button frequently to get the best image.
Adjusting the reticle
You can bring up the reticle by short-pressing once on the power button. Another short-press brings you to the reticle calibration mode. In this mode, the other 4 buttons can be used for zeroing. When you’re done you can short-press the power button again.
Using the camera (hardware)
Batteries and charging
The HT-C8 is powered by a single (rechargeable) 18500 battery which gives you enough juice for [3] hours of viewing time. I’ve tested this with the generic brand battery which came with the device. Opting for a quality battery from a known brand will probably increase this by 30 minutes or so. There's no sleep mode available so you'll want to turn the device off manually in-between use.
You can charge the battery while it’s in the camera or you can charge it externally with the supplied charger. The HT-C8 uses a USB Type-C port which I think is perfect for a camera in 2020/2021, no more mini- or micro-USB. There’s no led light to show the charging status, so if you want to be sure it’s 100% charged, use the external charger.
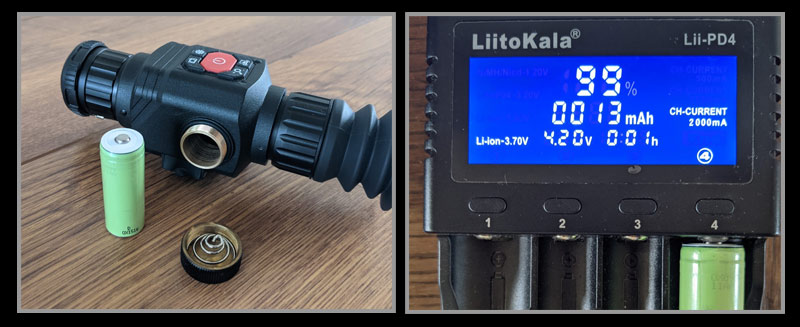 You can charge the battery internally or externally
The same port can be used to transfer images from the camera to your computer. Just connect the USB-cable, turn on the camera and start browsing your images, no need to install any drivers (at least on a Windows computer).
It’s possible to connect a power bank while using the camera but you’ll see a large charging icon on the screen, so I would only use this in case you run through all of your batteries.
All-in all I’m very happy with this setup. 18500 batteries are relatively cheap and small. I’d choose this setup any day over cameras with proprietary batteries or non-removeable ones.
Ergonomics and focusing
With its compact size the camera is easily handled one-handed. Since all buttons are on the top it doesn’t matter if you operate it left or right-handed. Reaching the buttons is easy and probably you’ll use your index- or middle finger (or both) to press them, depending on your preferred grip.
The round eyecup makes it possible to switch between your left- and right eye without having the turn the eyecup itself.
If you’re just using this camera as a spotting scope you might want to remove the eyecup altogether or change it for a smaller one. This way the camera will be even more compact and fits easier in your coat pocket…do this at your own risk though.
Both focus rings (ocular and objective lens) have just the right friction to focus easily and precise while not having to worry you’ll turn them by accident. The shortest focus distance (25mm model) is 50 centimeters (~19.6 inches).
Non-Uniformity Correction (NUC)
Like most thermal cameras the HT-C8 uses a mechanical shutter to continuously adjust itself, making sure the best image is preserved. While audible I didn’t find it too distracting, it’s quite gentle on this one. The NUC frequency depends often on the change of conditions (for example going from indoors to outdoors), when you’re outside for a while it will need to correct itself less and less. Please note that the image freezes for a moment when each calibration takes place.
Rail mount
As said before we've not tried this scope out attached to a weapon and we can only comment on the rail connector quality which seems durable, is made of metal and attaches perfectly to the HT-C8.
If you went shooting with this scope and feel like sharing your opinion leave a comment below so we can incorporate this into our review.
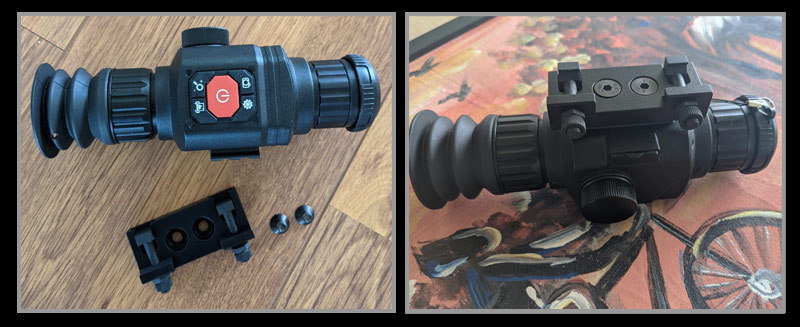 Rail mount attached
Image quality
One of the most important areas of a thermal camera (or any camera for that matter) is image quality. Yet, it’s also one of the hardest parts to review without getting too technical, especially when you consider this camera comes with a variety of lenses. I can only speak for the 25mm version, which has, like the other models, a 384 x 288 sensor with a 17-micron pixel size and a sensitivity of 40mK.
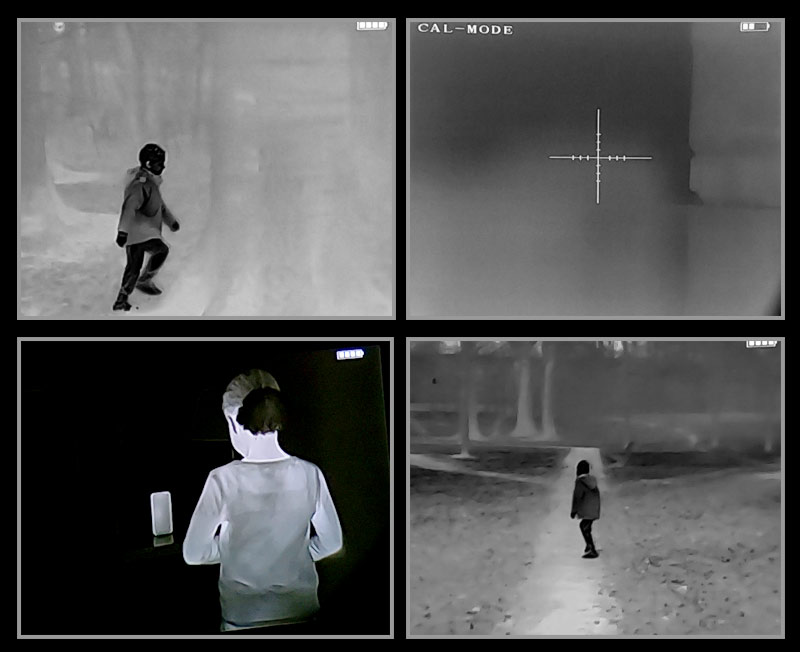
 Live view vs thermal view
Lens
This model has a F/1.0 lens which allows for a solid transmission of thermal radiation. This also means that you’ll be adjusting the focus a lot on shorter distances. After about 15 meters focus adjustments will be required less and less.
 Various pictures taken with the HT-C8
Weather conditions
I’ve took the camera outdoors with temperatures ranging from 3 to 10 degrees Celsius, in rain, foggy and sunny conditions (both during day- and nighttime).
In some conditions the camera really struggled to get a decent contrast. But to be fair, all uncooled cameras will have a hard time in foggy conditions with only tiny surface temperate differences. It’s just that by having no dedicated contrast adjustment it shows a bit more here, although playing with the brightness settings seemed to help.
 Various pictures taken with the HT-C8
One could argue that too much detail will just make it harder to find prey, but when you’re orientating yourself at night or in unknown territory it certainly helps.
When thermal conditions are better the camera does a really good job of getting detailed, smooth (50Hz) images. There’s no ghosting effect when quickly panning a scene and switching between different contrasts (like trees and sky) the HT C-8 almost instantly normalizes the scene. Due to the fair weight of the camera it’s easy to get a stable image and tracking birds or other fast-moving objects goes remarkably well.
Pictures and videos
Unfortunately, due to COVID-19 restrictions I have not (yet) been able to go to my go-to test area to test the camera with a variety of animals from different distances, so I had to bother my kids and family again to stand-in.
 Various pictures taken with the HT-C8
Since there’s no onboard video-recording I had to record videos through the viewfinder with a GoPro, not the best solution cause it turned out they were all barely useable. For reference I added an example video below while I keep looking for better ways to record live footage, those will be added to the review the coming days.
Zooming in goes quick and especially the 2x zoom does a good job enlarging the subject without it being overly processed. The 4x zoom you probably only use on rare occasions, it’s more suited for a > 640 x 480 sensor.
 Various image taken from video recorded through the viewfinder
I almost exclusively use the black hot, white hot modes since they offer the best viewing experience. Please note there’s no hot-spot tracking available to quickly identify prey.
All in all, I’m pleased with the image quality of this camera and it’s probably everything you expected of a camera with this type of lens and sensor. No more, no less.
 Live vs Thermal view
Warranty, availability and buying abroad
The HT-C8 comes with a one-year factory warranty which covers repairs when the camera is malfunctioning from the start or during this 12-month period. Some terms and conditions apply of course. As always ask around if you’re in doubt about any of them before making your purchase. After the warranty runs out you can still send it for repairs, but it’s likely all costs are on you.
Since most dealers are located outside the US/EU there are additional costs involved when sending back a device for repair, but I expect most dealers to cover those as well. Here again it’s always best to ask this before you buy it since you can’t walk into a store and ask for a repair or return. Also keep in mind that there will be import taxes involved if you’re not buying from an US/EU dealer. You can often calculate this upfront by consulting local tax laws.